Wicked Cupcake
This tutorial was written by Vivian Guerra : December 8, 2014.
Any similarities to another tutorial is purely coincidental.
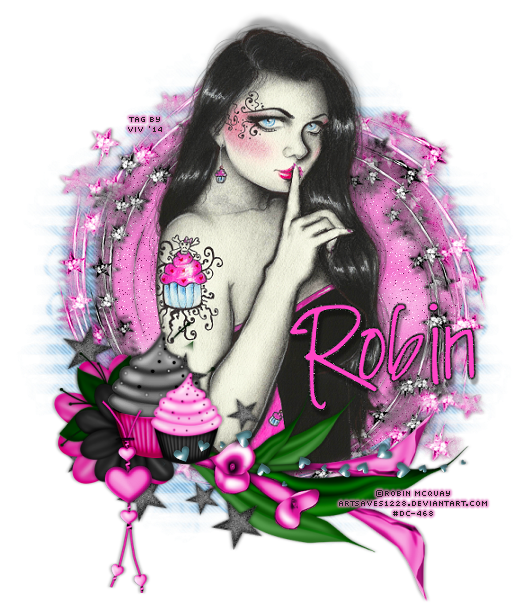
I am using the awesome artwork of Robin McQuay for this tutorial.
Must have a license to use.
No translating without my permission.
Do not copy my tutorials.
Direct people to this site by link only.
•••••••••
.:SUPPLIES:.
Tube or one of your choice
Scrapkit All Heart by Daphs Scrappin Kreations
Mask105 by Weecotslass
•••••••••
New Image
650x650
•••••••••
Open
DSKStarFrame1
DSKStarFrame2
Copy and paste onto your canvas.
Resize each to the size you like.
I resized so the overlapped it each other slightly.
I colorized DSKStarFrame1
Open
DSKpp4
Copy and paste.
I colorized the paper the same color I did the frame.
Drag below your frames.
Using your eraser tool, go around the edges of the frame
erasing the paper that is showing from beneath the edges.
•••••••••
Open your tube.
Copy and paste onto your canvas.
Resize if you want.
Position to fit the frames.
•••••••••
Open
DSKflowers2
DSKflowers3
DSKflowers5
Copy and paste onto your canvas.
Rotate DSKFlowers2 to the right by 90
I colorized the flowers and and placed along the bottom
of the frame and tube. I erased any part of the tube that was showing
from beneath the bottom of the flowers.
Resize the other flower elements. Colorize if you want.
I placed those to the left and layered them.
•••••••••
Open
DSKcupcake
DSKcupcake3
Copy and paste onto your canvas.
Again I colorized them to match the tube.
Resize and place them above your flower layers on the left.
Layer them as you'd like.
•••••••••
Open
DSKheartscatters
DSKbeadedheart
DSKstarscatters
Copy and paste onto your canvas.
Again I colorized them to match the tube.
Resize and place DSKbeadedheart above your flower and cupcake layers on the left.
The hearscatters I placed along the bottom flower layer.
See my tag for reference.
The starscatters I rotated slightly to the left, resized, and moved the layer below all
the element layers to the left.
See my tag for reference.
•••••••••
Open
Paper of choice.
Copy and paste, dragging the layer to the very bottom.
Apply your mask - Merge Group
•••••••••
Add your name
Add your favorite drop shadow to all layers.
Add your copyright.
•••••••••
And you are DONE!
••••••
Any similarities to another tutorial is purely coincidental.
I am using the awesome artwork of Robin McQuay for this tutorial.
Must have a license to use.
No translating without my permission.
Do not copy my tutorials.
Direct people to this site by link only.
•••••••••
.:SUPPLIES:.
Tube or one of your choice
Scrapkit All Heart by Daphs Scrappin Kreations
Mask105 by Weecotslass
•••••••••
New Image
650x650
•••••••••
Open
DSKStarFrame1
DSKStarFrame2
Copy and paste onto your canvas.
Resize each to the size you like.
I resized so the overlapped it each other slightly.
I colorized DSKStarFrame1
Open
DSKpp4
Copy and paste.
I colorized the paper the same color I did the frame.
Drag below your frames.
Using your eraser tool, go around the edges of the frame
erasing the paper that is showing from beneath the edges.
•••••••••
Open your tube.
Copy and paste onto your canvas.
Resize if you want.
Position to fit the frames.
•••••••••
Open
DSKflowers2
DSKflowers3
DSKflowers5
Copy and paste onto your canvas.
Rotate DSKFlowers2 to the right by 90
I colorized the flowers and and placed along the bottom
of the frame and tube. I erased any part of the tube that was showing
from beneath the bottom of the flowers.
Resize the other flower elements. Colorize if you want.
I placed those to the left and layered them.
•••••••••
Open
DSKcupcake
DSKcupcake3
Copy and paste onto your canvas.
Again I colorized them to match the tube.
Resize and place them above your flower layers on the left.
Layer them as you'd like.
•••••••••
Open
DSKheartscatters
DSKbeadedheart
DSKstarscatters
Copy and paste onto your canvas.
Again I colorized them to match the tube.
Resize and place DSKbeadedheart above your flower and cupcake layers on the left.
The hearscatters I placed along the bottom flower layer.
See my tag for reference.
The starscatters I rotated slightly to the left, resized, and moved the layer below all
the element layers to the left.
See my tag for reference.
•••••••••
Open
Paper of choice.
Copy and paste, dragging the layer to the very bottom.
Apply your mask - Merge Group
•••••••••
Add your name
Add your favorite drop shadow to all layers.
Add your copyright.
•••••••••
And you are DONE!
••••••
