watch the World
This tutorial was written by Vivian Guerra : July 1st, 2014.
Any similarities to another tutorial is purely coincidental.
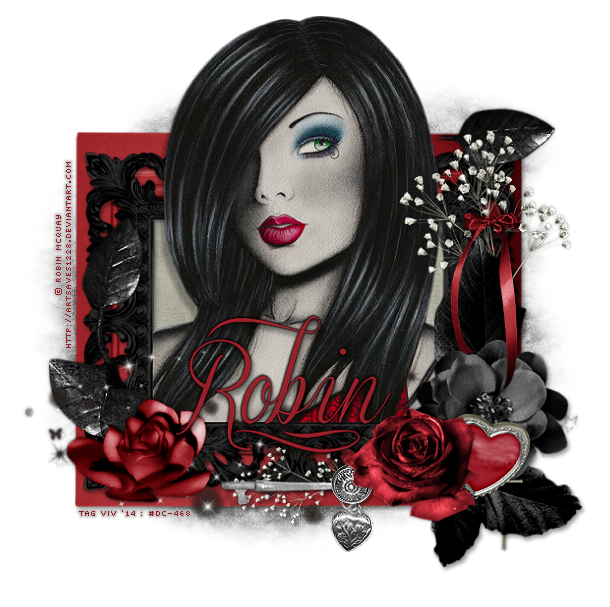
I am using the awesome artwork of Robin McQuay for this tutorial.
Must have a license from Digital Chaos to use.
No translating without my permission.
Do not copy my tutorials.
Direct people to this site by link only.
•••••••••
SUPPLIES
PSP9 or above
Tube or one of your choice
EyeCandy 4000 - Gradient Glow
Scrapkit Time Changes Whisprddreamz Designz
Mask110 by Designs by Vaybs
•••••••••
New Image
650x650
•••••••••
Open
frames (2)
frames (5)
Copy and paste both onto your canvas.
Image - Rotate - Free Rotate - Left - 90°
All layers & Rotate single layer unchecked
Resize the frames as you'd like.
Move frames (5) on top of frames (2)
Open
Tube
Copy and paste.
Resize so the edges line up with the top frames edges.
If you need to, use your selections - rectangle tool and select any
part of the tube overlapping the frame and delete.
•••••••••
Open
elements (7)
elements (34)
Copy and paste
Image - Flip on elements (7)
Resize and position at one of the bottom corners
of frames (5)
I colorized elements (34)
Resize and position behind elements (7)
Open
elements (12)
elements (13)
Copy and paste both
Resize and rotate them around your flowers.
Move these layers beneath both your flower layers.
Open
elements (1)
elements (4)
Copy and paste each
Resize so they are small enough, making elements (1) just slightly
smaller so it will fit over elements (4)
I rotated to the right by 15 and placed them so they were beneath
but sticking out from behind elements (12) and above elements (13)
•••••••••
Open
elements (29)
Copy and paste
Image - Flip
Image - Mirror
Resize and position so it wraps around your
tube layer. I erased any parts that covered any part of the tube.
I also erased at the bottom, so it didn't cover the top frame.
Open
elements (9)
elements (31)
Copy and paste.
Resize each and position
Use my tag as reference
Open
elements (30)
elements (38)
elements (39)
elements (40)
Copy and paste elements (30)
Rotate to the left by 90
Resize and place at the bottom along the edge of your frame
Do the same for elements (38)
Copy and paste elements (39 and 40)
Resize so they are small and place.
Use my tag as reference.
•••••••••
Open
elements (27)
Copy and paste
Rotate to the right slightly.
Open
elements (25)
elements (45)
Copy and paste
Resize and position and layer wherever
you think they look best.
Use my tag as reference
•••••••••
Open
paper (9)
Shift+D to Duplicate
Close the original.
Apply the mask.
Copy Merged
Paste onto your canvas.
Drag all the way to the bottom
Resize if needed.
•••••••••
Add your name and copyright info.
I added a Gradient Glow but this is optional
Add a drop shadow to your layers.
And you are DONE!
•••••••••
Any similarities to another tutorial is purely coincidental.
I am using the awesome artwork of Robin McQuay for this tutorial.
Must have a license from Digital Chaos to use.
No translating without my permission.
Do not copy my tutorials.
Direct people to this site by link only.
•••••••••
SUPPLIES
PSP9 or above
Tube or one of your choice
EyeCandy 4000 - Gradient Glow
Scrapkit Time Changes Whisprddreamz Designz
Mask110 by Designs by Vaybs
•••••••••
New Image
650x650
•••••••••
Open
frames (2)
frames (5)
Copy and paste both onto your canvas.
Image - Rotate - Free Rotate - Left - 90°
All layers & Rotate single layer unchecked
Resize the frames as you'd like.
Move frames (5) on top of frames (2)
Open
Tube
Copy and paste.
Resize so the edges line up with the top frames edges.
If you need to, use your selections - rectangle tool and select any
part of the tube overlapping the frame and delete.
•••••••••
Open
elements (7)
elements (34)
Copy and paste
Image - Flip on elements (7)
Resize and position at one of the bottom corners
of frames (5)
I colorized elements (34)
Resize and position behind elements (7)
Open
elements (12)
elements (13)
Copy and paste both
Resize and rotate them around your flowers.
Move these layers beneath both your flower layers.
Open
elements (1)
elements (4)
Copy and paste each
Resize so they are small enough, making elements (1) just slightly
smaller so it will fit over elements (4)
I rotated to the right by 15 and placed them so they were beneath
but sticking out from behind elements (12) and above elements (13)
•••••••••
Open
elements (29)
Copy and paste
Image - Flip
Image - Mirror
Resize and position so it wraps around your
tube layer. I erased any parts that covered any part of the tube.
I also erased at the bottom, so it didn't cover the top frame.
Open
elements (9)
elements (31)
Copy and paste.
Resize each and position
Use my tag as reference
Open
elements (30)
elements (38)
elements (39)
elements (40)
Copy and paste elements (30)
Rotate to the left by 90
Resize and place at the bottom along the edge of your frame
Do the same for elements (38)
Copy and paste elements (39 and 40)
Resize so they are small and place.
Use my tag as reference.
•••••••••
Open
elements (27)
Copy and paste
Rotate to the right slightly.
Open
elements (25)
elements (45)
Copy and paste
Resize and position and layer wherever
you think they look best.
Use my tag as reference
•••••••••
Open
paper (9)
Shift+D to Duplicate
Close the original.
Apply the mask.
Copy Merged
Paste onto your canvas.
Drag all the way to the bottom
Resize if needed.
•••••••••
Add your name and copyright info.
I added a Gradient Glow but this is optional
Add a drop shadow to your layers.
And you are DONE!
•••••••••
