Sweet Penta
This tutorital was written by Vivian Guerra : January 18, 2007.
Any similarities to another tutorial is purely coincidental.
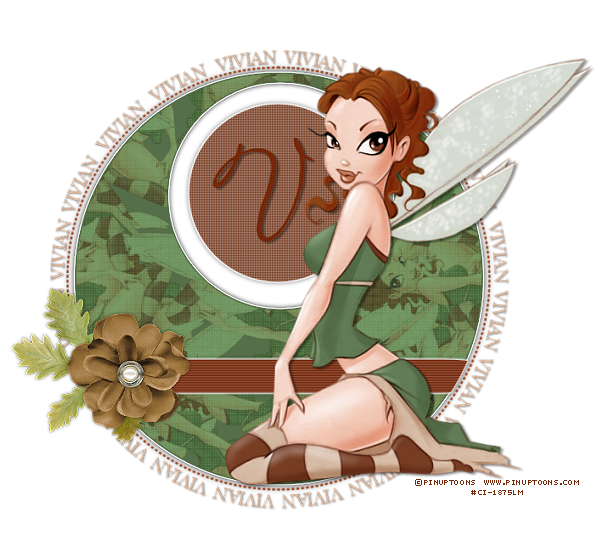
I am using the incredible artwork of PinupToons (Rion Vernon) for this tutorial!
You can find his awesome work @ Creative Design Outlet
No translating without my permission.
Do not copy my tutorials, direct people to this site by link only!!
•••••••••
.:Supplies:.
Tube of Choice
Fonts of Choice
Shape Aletmus Borders Four
Penta.Com Filter - Dot and Cross
Eye Candy 4000 - Gradient Glow + Glass
Mura's Meister - Copies
Scrap Elements of Choice:
The flower and leaf I used are from A Day in Autumn by
Verena Designs
•••••••••
Open a new image - 600x600
Floodfill with white.
Choose a color from your tube as background color.
No Foreground color.
Preset Shapes - AletmusBordersFour-,
Draw out the shape on your canvas.
Make it almost as big as the canvas.
Convert to raster layer
•••••••••
With your magic wand
Settings Tolerance 0, Feather 0
Click inside the shape.
Go to your Tube and copy.
Back on your shape paste as new layer.
Resize if Needed
Mura's Meister - Copies - Wallpaper Rotate
Default Settings - OK
Selections - Invert and on your tube layers
hit delete until all that is left is the images inside your shape.
Select none.
•••••••••
Hide your background and shape layers
Merge all tube layers together.
Unhide the other two layers.
Activate your Merged layer.
Change the Blend Mode to Overlay - lower the opacity of your tube layer to 45.
Go to Plugins - Penta.Com - Dot and Cross
Use the default settings
Select None.
•••••••••
Hide your background layer.
Merge your tube layer and shape layer together.
•••••••••
On this layer go to Eye Candy 4000 - Gradient Glow
Basic Settings - Glow Width : 3, Soft Corners : 0, Opacity 100
Color - Fat - Change the first white node to the color you used for your shape, leave
the other node white
Click Ok.
Add a drop shadow of your choice.
•••••••••
Go to Preset Shapes - Ellipse
Choose another color from your tube.
Draw a small circle inside the empty space of your shape.
Convert to raster layer.
Effects - Texture Effects - Blinds
Width 2 - Opacity 20
Color white
Horizontal Unchecked
Apply again, this time with Horizontal Checked.
(You can also apply the same Penta.Com Filter if you wish)
•••••••••
Eye Candy 4000 - Gradient Glow
Same settings as before, except change your first node back to white,
and delete the second.
Click Ok.
Apply drop shadow of choice.
•••••••••
Go to Preset Shapes - Ellipse
Choose a color from your tube as your Foreground
No Background color
Change the Line style to Dot - Width : 3.
Draw a circle around your shape.
Do not convert raster layer yet!
Choose your color for your text. Choose your font, I used Verdana - Size : 12.
Move your text took until you see a curved line under the A.
Type out your name around the circle.
•••••••••
On your layer palette click on the + next to your vector layer.
On your text Right click and choose create raster selection
This should cause your text to be selected.
Go to selections - Promote Selection to layer.
Back on your vector layer - right click on your text and clear.
Convert your dot outline circle to raster layer.
(Your text and dot outline circle should be two different layers at this point)
Add a drop shadow of your choice to your text.
•••••••••
With your text tool choose another font.
Type out the first letter in your name
and move to the small circle.
You can pull your letter until it is big enough
to almost take up the whole little circle.
When you are done, convert to raster layer
•••••••••
Eye Candy 4000 - Glass
Settings - Bevel Width : 5, Smoothness : 100 Edge Darkening 0, Gradient Shading 0,
Refraction 50, Opacity 0, Tinting 50 ... Glass color : white.
Click Ok.
Add a drop shadow of your choice.
Add any other text you wish!
Add any scrap elements you wish.
•••••••••
Copy and paste your tube and position where you think it looks best.
Add drop shadow of choice to your tube.
Add your copyright info and watermark.
Crop the excess white background.
You're Done!
This tutorital was written by Vivian Guerra : January 18, 2007.
Any similarities to another tutorial is purely coincidental.
I am using the incredible artwork of PinupToons (Rion Vernon) for this tutorial!
You can find his awesome work @ Creative Design Outlet
No translating without my permission.
Do not copy my tutorials, direct people to this site by link only!!
•••••••••
.:Supplies:.
Tube of Choice
Fonts of Choice
Shape Aletmus Borders Four
Penta.Com Filter - Dot and Cross
Eye Candy 4000 - Gradient Glow + Glass
Mura's Meister - Copies
Scrap Elements of Choice:
The flower and leaf I used are from A Day in Autumn by
Verena Designs
•••••••••
Open a new image - 600x600
Floodfill with white.
Choose a color from your tube as background color.
No Foreground color.
Preset Shapes - AletmusBordersFour-,
Draw out the shape on your canvas.
Make it almost as big as the canvas.
Convert to raster layer
•••••••••
With your magic wand
Settings Tolerance 0, Feather 0
Click inside the shape.
Go to your Tube and copy.
Back on your shape paste as new layer.
Resize if Needed
Mura's Meister - Copies - Wallpaper Rotate
Default Settings - OK
Selections - Invert and on your tube layers
hit delete until all that is left is the images inside your shape.
Select none.
•••••••••
Hide your background and shape layers
Merge all tube layers together.
Unhide the other two layers.
Activate your Merged layer.
Change the Blend Mode to Overlay - lower the opacity of your tube layer to 45.
Go to Plugins - Penta.Com - Dot and Cross
Use the default settings
Select None.
•••••••••
Hide your background layer.
Merge your tube layer and shape layer together.
•••••••••
On this layer go to Eye Candy 4000 - Gradient Glow
Basic Settings - Glow Width : 3, Soft Corners : 0, Opacity 100
Color - Fat - Change the first white node to the color you used for your shape, leave
the other node white
Click Ok.
Add a drop shadow of your choice.
•••••••••
Go to Preset Shapes - Ellipse
Choose another color from your tube.
Draw a small circle inside the empty space of your shape.
Convert to raster layer.
Effects - Texture Effects - Blinds
Width 2 - Opacity 20
Color white
Horizontal Unchecked
Apply again, this time with Horizontal Checked.
(You can also apply the same Penta.Com Filter if you wish)
•••••••••
Eye Candy 4000 - Gradient Glow
Same settings as before, except change your first node back to white,
and delete the second.
Click Ok.
Apply drop shadow of choice.
•••••••••
Go to Preset Shapes - Ellipse
Choose a color from your tube as your Foreground
No Background color
Change the Line style to Dot - Width : 3.
Draw a circle around your shape.
Do not convert raster layer yet!
Choose your color for your text. Choose your font, I used Verdana - Size : 12.
Move your text took until you see a curved line under the A.
Type out your name around the circle.
•••••••••
On your layer palette click on the + next to your vector layer.
On your text Right click and choose create raster selection
This should cause your text to be selected.
Go to selections - Promote Selection to layer.
Back on your vector layer - right click on your text and clear.
Convert your dot outline circle to raster layer.
(Your text and dot outline circle should be two different layers at this point)
Add a drop shadow of your choice to your text.
•••••••••
With your text tool choose another font.
Type out the first letter in your name
and move to the small circle.
You can pull your letter until it is big enough
to almost take up the whole little circle.
When you are done, convert to raster layer
•••••••••
Eye Candy 4000 - Glass
Settings - Bevel Width : 5, Smoothness : 100 Edge Darkening 0, Gradient Shading 0,
Refraction 50, Opacity 0, Tinting 50 ... Glass color : white.
Click Ok.
Add a drop shadow of your choice.
Add any other text you wish!
Add any scrap elements you wish.
•••••••••
Copy and paste your tube and position where you think it looks best.
Add drop shadow of choice to your tube.
Add your copyright info and watermark.
Crop the excess white background.
You're Done!
