Mermaid's Day
This tutorial was written by Vivian Guerra : June 16, 2014.
Any similarities to another tutorial is purely coincidental.
I am using the awesome artwork of Ismael Rac for this tutorial.
No translating without my permission.
Do not copy my tutorials.
Direct people to this site by link only.
•••••••••
SUPPLIES
PSP9 or above
Tube or one of your choice
EyeCandy 4000 - Gradient Glow
At the Beach scrapkit by Bits n Bobs
Mask of choice
•••••••••
New Image
600x600
•••••••••
Preset Shape - Ellipse
Foreground:
Choose a color from your tube.
Background: Off
Anti-Alias
Create as vector
Line Style: Solid
Width: 15
Holding down the Shift key,
draw out a circle on your canvas.
Make it as big as you'd like.
Objects - Align - Center in canvas
Convert to Raster Layer.
•••••••••
Open
paper-15
Copy and paste
Drag below your circle layer.
Resize to fit as you'd like inside.
Go around and erase the paper that is
showing from the edges of the circle.
(Optional)
I used another paper at the bottom of the circle to
make it appear like water. This is up to you to do if you wish.
Open your tube
Copy and paste onto your canvas.
Resize and position.
•••••••••
Open
ATB-3
ATB-12
ATB-13
ATB-47
ATB-48
ATB-49
ATB-52
ATB-55
ATB-71
Copy and paste onto your canvas.
Resize and position each element as you go.
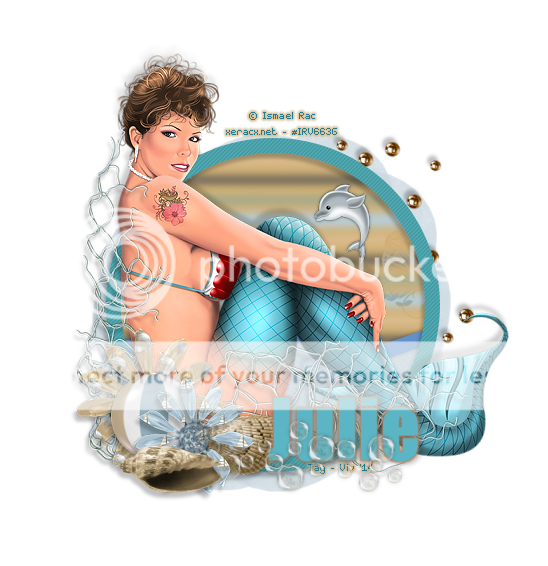
The little dolphin I placed in the foreground to appear as if
he was jumping out of the water.
Use my tag as a reference.
•••••••••
Open
paper-1
Shift+D to duplicate.
Close the original.
Apply your mask.
Copy and paste onto your canvas.
Drag layer all the way to the bottom.
If needed resize until it fits how you like.
•••••••••
Add your name and copyright info.
I added a Gradient Glow but this is optional
Add a drop shadow to your layers.
And you are DONE!
•••••••••
Any similarities to another tutorial is purely coincidental.
I am using the awesome artwork of Ismael Rac for this tutorial.
No translating without my permission.
Do not copy my tutorials.
Direct people to this site by link only.
•••••••••
SUPPLIES
PSP9 or above
Tube or one of your choice
EyeCandy 4000 - Gradient Glow
At the Beach scrapkit by Bits n Bobs
Mask of choice
•••••••••
New Image
600x600
•••••••••
Preset Shape - Ellipse
Foreground:
Choose a color from your tube.
Background: Off
Anti-Alias
Create as vector
Line Style: Solid
Width: 15
Holding down the Shift key,
draw out a circle on your canvas.
Make it as big as you'd like.
Objects - Align - Center in canvas
Convert to Raster Layer.
•••••••••
Open
paper-15
Copy and paste
Drag below your circle layer.
Resize to fit as you'd like inside.
Go around and erase the paper that is
showing from the edges of the circle.
(Optional)
I used another paper at the bottom of the circle to
make it appear like water. This is up to you to do if you wish.
Open your tube
Copy and paste onto your canvas.
Resize and position.
•••••••••
Open
ATB-3
ATB-12
ATB-13
ATB-47
ATB-48
ATB-49
ATB-52
ATB-55
ATB-71
Copy and paste onto your canvas.
Resize and position each element as you go.
The little dolphin I placed in the foreground to appear as if
he was jumping out of the water.
Use my tag as a reference.
•••••••••
Open
paper-1
Shift+D to duplicate.
Close the original.
Apply your mask.
Copy and paste onto your canvas.
Drag layer all the way to the bottom.
If needed resize until it fits how you like.
•••••••••
Add your name and copyright info.
I added a Gradient Glow but this is optional
Add a drop shadow to your layers.
And you are DONE!
•••••••••
