Hello Spring
This tutorial was written by Vivian Guerra : March 15th, 2013.
Any similarities to another tutorial is purely coincidental.
I am the awesome artwork of Lady Mishka for this tutorial!
Her work can now be found at Scraps & the City
No translating without my permission.
Do not copy my tutorials.
Direct people to this site by link only!
•••••••••
.:SUPPLIES:.
Tube of your choice
Font I used Honey Script @ DaFont
EyeCandy 4000 - Gradient Glow
Mask of choice or I used Mask 297 from Weescotslass
The kit I used is called Hello Spring from agnesingap designs.
It is free @ DigiCrea for now.
•••••••••
New Image
Make the canvas large as you'll need a lot of room.
750x750
Floodfill with white
•••••••••
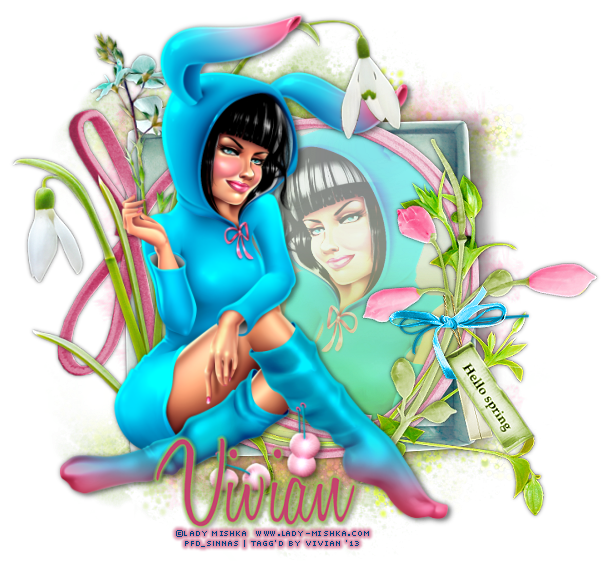
From the kit open element 13
(the blue box)
Paste onto your canvas - Resize
Position in he center.
Mine appeared off center so I moved it.
Now, open element 19.
(the frame with the bow)
Colorize to match your tube.
Position over the blue box.
I rotated it 90° but it's up to you.
•••••••••
(I like to work around my tube but it's up to you to do this next step or wait)
Paste tube - Resize and position to your liking.
•••••••••
Selection tool - Circle
Try to get as much of the inside of the circle in element 19 as you can
Paste your tube and position
Invert - delete excess
I changed the properties to Hard light @ 40%
•••••••••
Open elements 3, 4, 5, 24
Resize and position around the tube.
See my tag for reference.
Part of my tube's ear covered element 5
If you are using the same tube,
I erased a little of the ear so the flower could show through
I also colorized the buds and stem of element 3 to match my tube.
•••••••••
Okay, now open elements 15, 16, 18
Colorize to match.
Position wherever you think they look best,
or use my tag as a reference.
•••••••••
Open element 25
Position at top of the blue
Layers - Arrange - Send to bottom
Duplicate and mirror.
It acts as a sort of mask.
•••••••••
If you waited til now, you can paste your tube and resize and position.
Add your favorite drop shadow to all your layers.
•••••••••
Add your name
Add copyright
Crop the image getting rid of the excess canvas.
Resize all layers if needed as well.
•••••••••
And you are DONE!
Any similarities to another tutorial is purely coincidental.
I am the awesome artwork of Lady Mishka for this tutorial!
Her work can now be found at Scraps & the City
No translating without my permission.
Do not copy my tutorials.
Direct people to this site by link only!
•••••••••
.:SUPPLIES:.
Tube of your choice
Font I used Honey Script @ DaFont
EyeCandy 4000 - Gradient Glow
Mask of choice or I used Mask 297 from Weescotslass
The kit I used is called Hello Spring from agnesingap designs.
It is free @ DigiCrea for now.
•••••••••
New Image
Make the canvas large as you'll need a lot of room.
750x750
Floodfill with white
•••••••••
From the kit open element 13
(the blue box)
Paste onto your canvas - Resize
Position in he center.
Mine appeared off center so I moved it.
Now, open element 19.
(the frame with the bow)
Colorize to match your tube.
Position over the blue box.
I rotated it 90° but it's up to you.
•••••••••
(I like to work around my tube but it's up to you to do this next step or wait)
Paste tube - Resize and position to your liking.
•••••••••
Selection tool - Circle
Try to get as much of the inside of the circle in element 19 as you can
Paste your tube and position
Invert - delete excess
I changed the properties to Hard light @ 40%
•••••••••
Open elements 3, 4, 5, 24
Resize and position around the tube.
See my tag for reference.
Part of my tube's ear covered element 5
If you are using the same tube,
I erased a little of the ear so the flower could show through
I also colorized the buds and stem of element 3 to match my tube.
•••••••••
Okay, now open elements 15, 16, 18
Colorize to match.
Position wherever you think they look best,
or use my tag as a reference.
•••••••••
Open element 25
Position at top of the blue
Layers - Arrange - Send to bottom
Duplicate and mirror.
It acts as a sort of mask.
•••••••••
If you waited til now, you can paste your tube and resize and position.
Add your favorite drop shadow to all your layers.
•••••••••
Add your name
Add copyright
Crop the image getting rid of the excess canvas.
Resize all layers if needed as well.
•••••••••
And you are DONE!
