Babe
This tutorial was written by Vivian Guerra : April 27, 2014.
Any similarities to another tutorial is purely coincidental.
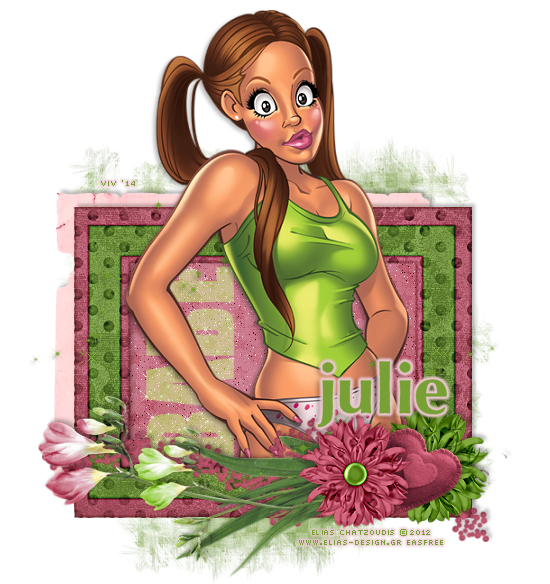
I am using the awesome artwork of Elias Chatzoudis for this tutorial.
This is a FTU Tube you have to get from his website.
No translating without my permission.
Do not copy my tutorials.
Direct people to this site by link only.
•••••••••
SUPPLIES
PSP9 or above
Tube or one of your choice
EyeCandy 4000 - Gradient Glow
Xenofex 2 - Constellation
Scrapkit Babe-a-licious from Bits n Bobs
Mask297 by Weescotslass or one of your choice.
•••••••••
New Image
650x650
•••••••••
Open
BNB-frame-5
Copy and paste onto your canvas.
Rotate to the left by 90°
Resize if needed
Open
BNB-paper-10
Using your magic wand click inside your frame
Selection - Modify - Expand by 3
Copy and paste the paper onto your canvas.
Resize to fit into your frame.
Selections - Invert - Delete - Deselect
Drag the paper below your frame
I added some noise to the paper but this is up to you.
Open your tube.
Copy and paste.
Position and resize if needed.
•••••••••
Open
BNB-note-paper-2
Copy and paste
Rotate to the left by 90°
Drag below your paper and frame layer.
Position as you'd like.
I left it sticking out at the top and one side.
Open
BNB-flower-1
BNB-flower-2
BNB-padded-heart-2
Copy and paste onto your canvas.
Resize and position.
Use my tag as a reference.
•••••••••
Open
BNB-plant-1
BNB-plant-2
BNB-scatter-2
Copy paste each onto your canvas.
Resize and rotate to the left by 90°
Image - Flip
For the scatter just resize and position where you'd like
Use my tag as reference but you really just
want to layer the elements to your liking.
•••••••••
Open
BNB-paper-9
Shift+D to duplicate.
Close the original.
Apply your mask.
Copy and paste onto your canvas.
Resize a few times.
Drag layer all the way to the bottom.
If needed resize until it fits how you like.
•••••••••
Using the Impact font,
type out the word BABE
Rotate to the left by 90°
Convert to Raster Layer.
Resize to fit inside your frame.
Use my tag as a guide
Add your favorite Xenofex 2 - Constellation settings.
Change the Properties, blending it into your paper.
•••••••••
Add your name and copyright info.
I added a Gradient Glow but this is optional
Add a drop shadow to your layers.
And you are DONE!
•••••••••
Any similarities to another tutorial is purely coincidental.
I am using the awesome artwork of Elias Chatzoudis for this tutorial.
This is a FTU Tube you have to get from his website.
No translating without my permission.
Do not copy my tutorials.
Direct people to this site by link only.
•••••••••
SUPPLIES
PSP9 or above
Tube or one of your choice
EyeCandy 4000 - Gradient Glow
Xenofex 2 - Constellation
Scrapkit Babe-a-licious from Bits n Bobs
Mask297 by Weescotslass or one of your choice.
•••••••••
New Image
650x650
•••••••••
Open
BNB-frame-5
Copy and paste onto your canvas.
Rotate to the left by 90°
Resize if needed
Open
BNB-paper-10
Using your magic wand click inside your frame
Selection - Modify - Expand by 3
Copy and paste the paper onto your canvas.
Resize to fit into your frame.
Selections - Invert - Delete - Deselect
Drag the paper below your frame
I added some noise to the paper but this is up to you.
Open your tube.
Copy and paste.
Position and resize if needed.
•••••••••
Open
BNB-note-paper-2
Copy and paste
Rotate to the left by 90°
Drag below your paper and frame layer.
Position as you'd like.
I left it sticking out at the top and one side.
Open
BNB-flower-1
BNB-flower-2
BNB-padded-heart-2
Copy and paste onto your canvas.
Resize and position.
Use my tag as a reference.
•••••••••
Open
BNB-plant-1
BNB-plant-2
BNB-scatter-2
Copy paste each onto your canvas.
Resize and rotate to the left by 90°
Image - Flip
For the scatter just resize and position where you'd like
Use my tag as reference but you really just
want to layer the elements to your liking.
•••••••••
Open
BNB-paper-9
Shift+D to duplicate.
Close the original.
Apply your mask.
Copy and paste onto your canvas.
Resize a few times.
Drag layer all the way to the bottom.
If needed resize until it fits how you like.
•••••••••
Using the Impact font,
type out the word BABE
Rotate to the left by 90°
Convert to Raster Layer.
Resize to fit inside your frame.
Use my tag as a guide
Add your favorite Xenofex 2 - Constellation settings.
Change the Properties, blending it into your paper.
•••••••••
Add your name and copyright info.
I added a Gradient Glow but this is optional
Add a drop shadow to your layers.
And you are DONE!
•••••••••
